How do I apply for an SSL certificate as a reseller?
Back to sslTo request an SSL certificate you need to take the following steps:
- Log in to my.oxxa.com.
- Click on the "SSL" tab in the menu on the left.
- Click on "New SSL."
The following screen will appear (see image below)
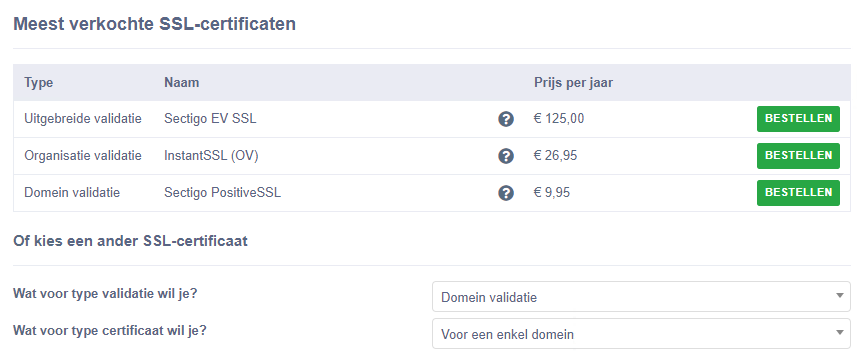
Types of SSL certificates
Select the desired certificate here, the specifications can be found by clicking on the question mark.
There are different types of SSL certificates.
Not sure what kind of certificate is best to order?
In the article: What is an SSL certificate we explain the differences.
Ordering the certificate
Select the desired certificate and click on "Order".
A new screen will appear and you will be asked for more information as shown in the screenshot below.
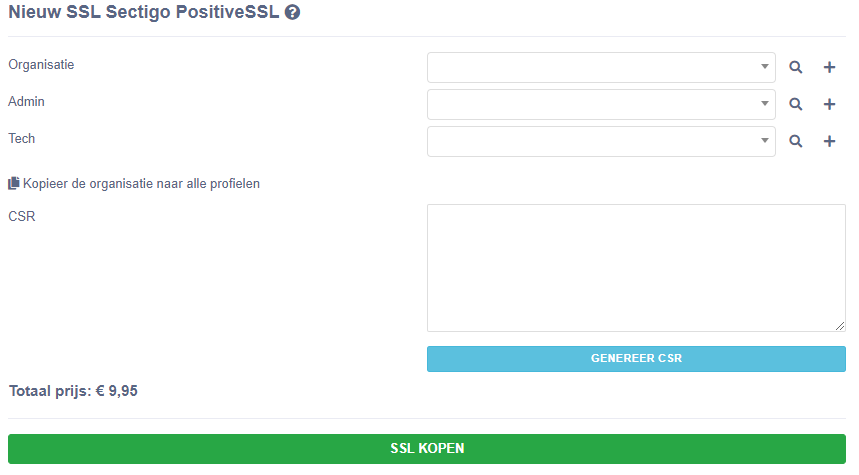
Contact profiles
Under Organization / admin and tech, select a contact profile.
You can click the dropdown and then type in the name or click the magnifying glass icon to find the profile to go with it or click the + icon to add a new profile.
The SSL certificate will be sent to the Admin contact.
Generate CSR
If you have not yet created a CSR, you can click on the blue "Generate CSR" button.
Once you click it, a new form will open and you will need to fill it out.
Fill out the form like the example below:
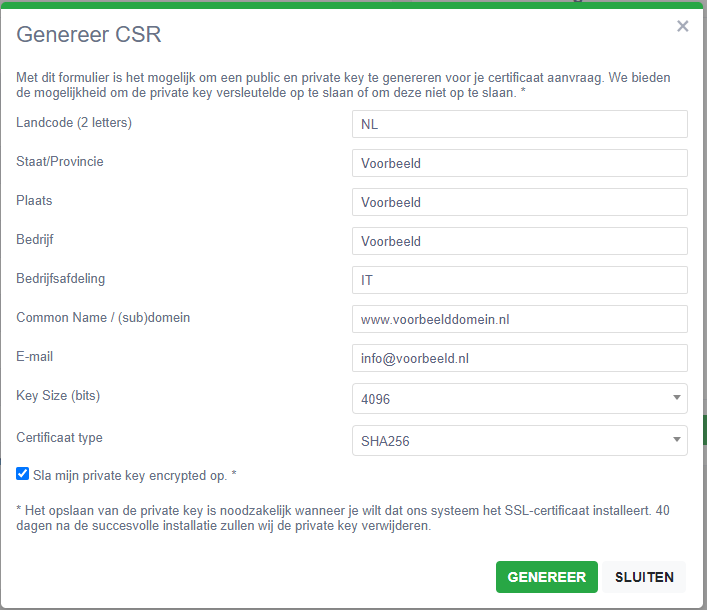
Save Private Key or Not?
At the bottom there is an option to save your private key encrypted.
When this option is checked you can always find the private key in our portal when needed.
Generate CSR
Click on Generate to generate the CSR and private key.
Validation methods
Now there are a few more fields, including the validation method.
You can choose from 4 different validation methods namely
- E-mail validation
- File validation (http)
- File validation (https)
- Cname
Choose the validation method that best suits your situation.
E-mail validation
An email is sent to the selected email address.
If it is possible to retrieve the email address from the WHOIS of the domain name (which you entered under common name when creating the CSR) you can use a WHOIS email address.
In addition to the email addresses that can be retrieved from the whois you also have the option of choosing the default email addresses. These are hostmaster@jedomeinnaam.nl / postmaster@jedomeinnaam.nl / webmaster@jedomeinnaam.nl. If the email address does not exist, you can create it or have it forwarded.
Not in all cases email validation can be used. For example, often people with office365 have a problem with email validation because you pay per email account there. In that case, it's better to use another validation method.
In the email is a link and a code.
Click on the link and enter the code to confirm the request.
The certificate is then active and can be found in the my.oxxa.com environment.
Not receiving the email? Then check the spam folder and/or spam filter settings.
File validation
As the name implies, this method allows you to download a file.
The idea is that you upload it to your website, this can be done via FTP.
The file must be placed in the folder well-known and in that folder there must be a folder called pki-validation. The data can be found in our portal.
Once you have uploaded the file, it may take a few minutes to validate it.
Make sure .htaccess does not make any changes, such as a redirect.
You can choose either http or https. If you redirect your website from http to https, it is also recommended to choose the https validation method.
CNAME validation
With this method, you get a CNAME DNS record.
You need to add the CNAME record.
With mxtoolbox or any CNAME checker you can do a check to see if the CNAME is created correctly.
Complete the order
Then click buy SSL, perform the validation as explained in the options above.
The certificate will be sent by email (regardless of which method you chose) to the admin contact and also the certificate will be visible in the my.oxxa.com environment.
